
CHELSEA 1:2 FULHAM Tactical Analysis & Match Report An intense west London derby saw the Blues seize an early lead, only for the visitors to stage a spirited late comeback, capitalizing on Chelsea's fatigue to bring an end to their impressive unbeaten streak. Analysis thread

Two west London rivals faced each other at Stamford Bridge earlier tonight in a well-fought contest. Chelsea and Fulham, two in-form teams that have exceeded pre-season expectations, produced a competitive match. Despite taking the lead in the first half through a magical Cole Palmer move, Fulham surged to stage a dramatic comeback after Marco Silva's shrewd substitutions. In this thread, I will comprehensively evaluate the tactical battle that unfold in west London. Let's dive in.

In settled possession, Chelsea set-up in a 3-1-6 shape - a system we've seen Maresca opt for on multiple occasions this season. This meant that Cucurella would join the frontline in the half-space whilst Gusto tucked in to join the back three. Meanwhile, Fulham were in an organized 4-1-4-1 structure.


Though on paper this meant that Chelsea had a +2 advantage against Fulham's backline, Silva's set-up delegated responsibility to the wide men (Traore and Iwobi) to shadow-mark the Chelsea no.8s (Cucurella and Enzo). This would negate direct access into the Chelsea no.8s. However, the Blues could still get the ball to them through wide combinations or if the Fulham wide men got their pressing angles wrong.

The downside of Fulham's structure was evident in the opening minutes when Chelsea generated a chance after bypassing the frontline press. Traore gets his pressing angle wrong -> Tosin to Cucurella passing lane opens -> Cucurella finds Sancho -> cuts inside and delivers a dangerous cross into the penalty box.


Fulham were prepared for such situations. Although it did not always help mitigate Chelsea from creating chances, they still had a plan. The nearest midfielder in the second line of pressure would shift to the free Chelsea no.8, with the rest of the members consisting the second line shifting across. Therefore, leaving the opposite no.8 free.


However, it's worth noting that this shift in the second line press was not always when the initial press failed. Rather, the Fulham wide men would occasionally look to press the Chelsea wide centre-backs. Additionally, the narrowness of the Fulham OOP system would leave wingers isolated 1v1 against the fullbacks.

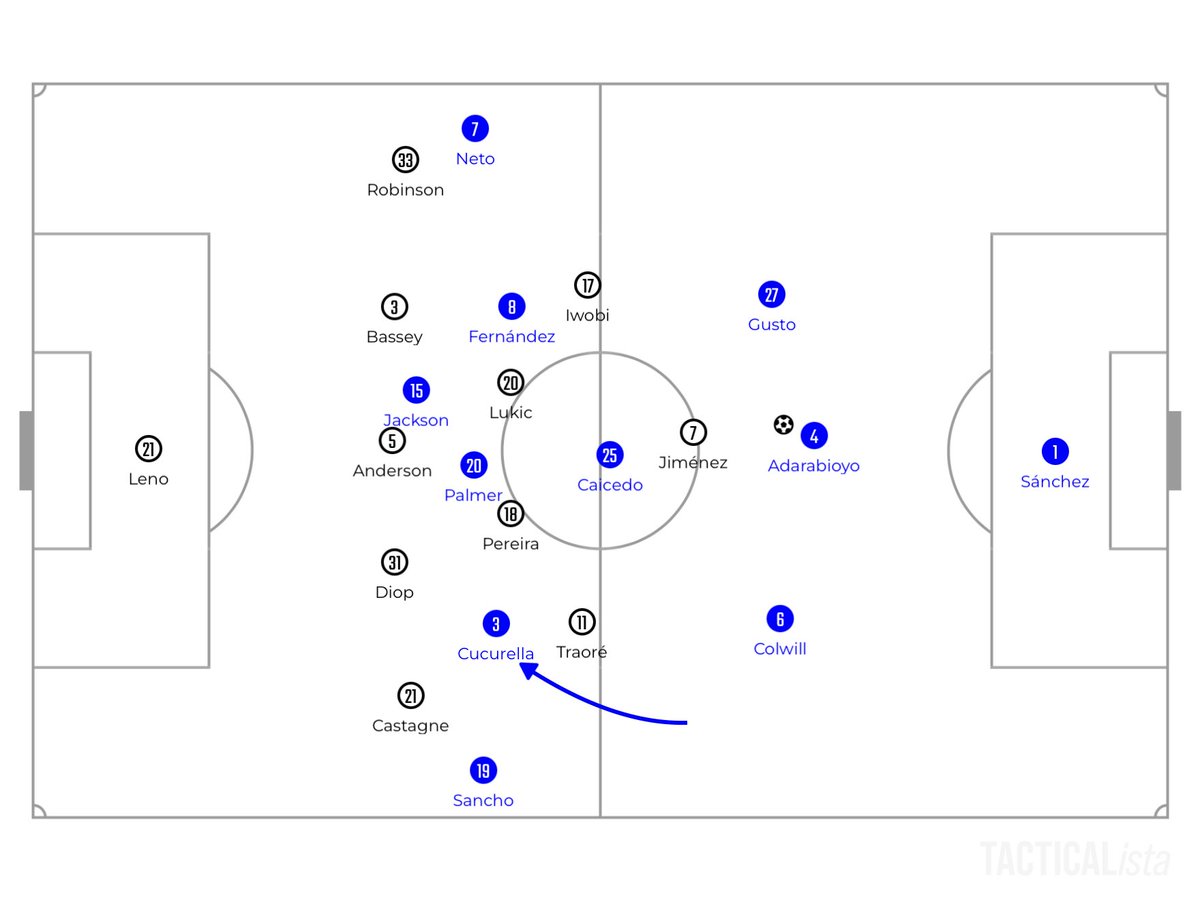
Fulham's frontline press, however, was aggressive and well-drilled. It involved the following: - The Fulham striker initially pressing the Chelsea centre-back, and then curving the run to press the goalkeeper whilst also trying to cut a pass to Caicedo. - The Fulham wide had each different roles. The Fulham LW specifically had dual roles - initially sitting off to deny central access before pressing the opposite centre-back. The RW only focused on the Chelsea LB. - The last member of the Fulham frontline press would sit on Enzo first before jumping to Caicedo if found. Meanwhile, the LW would simultaneously shift to mark Enzo.

As for the rest of the team, the Fulham LWB would man-mark the Chelsea RB. The Fulham RWB would man-mark the LW. And then, the LCB would mark the Chelsea RW. The Fulham DM would then mark Palmer whilst the centre backs had a +1 on Jackson. You can see this all in-action from the below screengrabs. Specifically, try to focus on how the Fulham players shift across. Super well-coached.


However, the passive mid-block approach cost Fulham a goal. Especially with Palmer roaming and finding pockets of space, a lapse of concentration was enough for Chelsea to capitalize magnificently.
Apart from the goal, there were other chances for Chelsea against Fulham's passive mid-block. Palmer was clever with his movement. Once he receives the ball in such areas, it's really difficult to defend him.
Before we touch on Chelsea's defensive and Fulham's offensive tactics, there are two aspects to talk about. Firstly, Chelsea's wastefulness in the attacking third when it comes to executing the final pass/finish.
Secondly, there were also plenty of turnovers throughout the game. With both teams capable in offensive transitions, many goal-scoring opportunities were created. Look at this clip below where there were continuous back-and-forth moments.
Defensively, Chelsea tried to press with a -1 from the front. Following were the roles: - Jackson pressed the Fulham CCB before curving his run to press the GK. - Sancho would press the opposite CB. - Enzo man-marks the RCB. - Palmer on the Fulham DM. - Caicedo man-marks Pereira. - Neto man-marks Robinson - Chelsea's backline then has a +1. This would transition to a man-oriented press if the Fulham RWB who's initially unmarked is found.

This defensive scheme changed in the second half as Sancho sat on the Fulham RB (since he was constantly found out in the first half). Enzo would also initially provide central coverage before pressing the Fulham LCB. Fulham's build-up structure would alter between a 4-2-4 and 4-1-5 depending on the positioning of Pereira, who dropped deep at times whilst pushing up otherwise. When the Fulham GK was involved, the CB Andersen could also push up as a pivot.

The issue with Chelsea defensively was less about the tactics and more about the execution. Especially in the second half, Chelsea looked very lethargic. This and a poorly timed press led to uncoordinated OOP moves.
As for Fulham in-possession, they'd form a 3-2-5/3-1-6 with the wingbacks pushing up to provide the width, Traore and Iwobi playing as 10s in the half-space, and Pereira dropping in and out from the midfield and frontline. They mainly worked their chances through the left wing whilst also relying on transitions for creating chances.


Well, an argument you could make is that when the Chelsea players were exhausted, Maresca could've opted for a passive and compact mid-block. But he didn't. More generally this season, Chelsea hasn't really relied on that tactic as well. Maybe that's because it isn't developed yet. Something to think about for sure. The drop in defensive intensity (not like it was high in the first half) changed the tide of the game. (@markrstats)

Meanwhile, Fulham upped their OOP intensity - looking to transition to press the Chelsea CBs early and have their second line shift across (as discussed previously). With Chelsea now not as crisp in-possession, they found it difficult to break Fulham.
Moreover, the issue was that in the middle third, Chelsea were caught between a man-oriented responsibilities for some players (mainly the frontline) whilst the remaining players played zonal. This would open up space to be easily played through.
The fatigue also translated to the psychological side, with Chelsea players switching off on when to jump up and when to drop off. There were numerous situations in the second half where Chelsea's rest defence was thereby left vulnerable.
Another criticism I'd also have is regarding the substitutions. Rather, the lack of them. Yes, the bench wasn't strong. But there was still enough quality to tweak a bit apart from Nkunku for Jackson.

Overall, the inability to control the match with possession when we were leading coupled with the defensive issues Chelsea have carried over the past few weeks led to the loss. It puts a stop to the winning streak and thereby the momentum but it's a learning curve for a developing side. And a gentle reminder that there is a long way to go before maturing into title contenders.
