
For all of the in-possession criticism of Russel Martin and Southampton, his out-of-possession tactics ultimately led to the result before his sacking. Let's take a deeper look at Southampton's OOP tactics. THREAD🧵

Southampton lined up with a 4-4-2 diamond. With split strikers, Southampton looked to press high. From the 1st minute, we see a problem. Sulemana closes Forster down; the goalkeeper makes a simple link pass to get his centre back on the ball. Line one of the press is broke.

Spurs now have 4v3 on the midfield line with the familiar site of their full-backs inverting. Sarr rotates with Spence and they combine as Maddison makes his move untracked off the back of the midfield line.

Both centre-backs are drawn to Solanke. With the midfield overload, Maddison has become the free man, and neither the midfield nor the defensive unit takes responsibility for him. This leads to the first goal after 40 seconds.

Armstrong and Sulemena have dual roles. At times, they were the highest-pressing players but also responsible for tracking the Spurs' full-backs. There's a simple out ball for the Spurs as the full-backs hold their wide position.

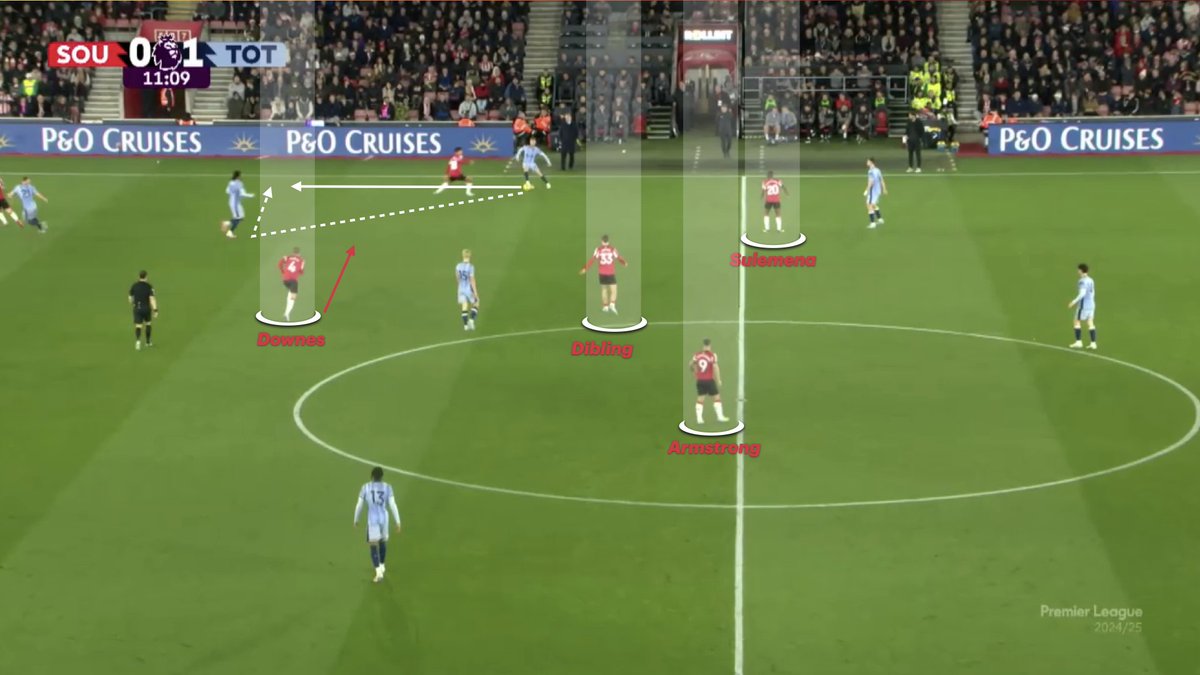
And with little pressure on the ball, the outnumbered Southampton midfield looked to cover the ball side. Armstrong divides the opposite side centre back, and left back. The distance is too large to cover.


Despite their attempts, Dibling, Sulemena and Armstrong offered nothing in terms of pressing high. With the large distances to cover, Spurs could pick them off and build their attacks with these three players out of the game.


Goal number two Spence and Maddison rotate and have a 2v1. Downes can't get out to support. They play the ball around Fernandes for Maddison to cross and Son to score. Note the positions of Dibling, Armstrong and Sulemena. This will leave their defence exposed to an overload.
Martin brought Sulemena off after fifteen minutes and went to a 5-3-2. Dibling playing just behind Armstrong. A full week of training has now been wasted as they move to damage limitation at 3-0.
Dibling joins Armstrong on the first line of the press in this 5-3-2 and is ready to jump onto Gray at left centre-back for Spurs. There is never any real pressure on the ball on the opposite side of the pitch, and Spurs find the switch again to stretch the three man Saints midfield.

The new formation leaves the wing-backs isolated in possession. Southampton compensates for this by providing support beyond the Spurs' defensive line. This leaves them wide open for the counter-attack.

Udogie steals the ball and Southampton are outnumbered. Sarr, who we have highlighted, continues his run to score the fourth goal.


The Southampton midfield three are highlighted here on this Spurs transition leading to the fourth goal...

Dibling seemed to have a free role out of possession. In this position, you would think he would mark the deep-lying midfielder of Spurs, but he didn't. He picked up positions where he could hurt Spurs on the transition. Southampton can't afford this luxury.

From there, it was difficult to tell Southampton's pressing style. While they didn't sit off in a low block, they never got any pressure on the ball and left huge distances to cover in wide areas. It was apparent this system had not been worked on.

And the fifth and final goal came from this set-up. Again, there is no real pressure on the ball, but Southhampton continue to press without any real intensity. The two forwards and three midfielders are connected but are not backed up by any defenders. It's an 8v5 including the goalkeeper.

Spurs switch the play slowly, and Southampton don't shift across the pitch with any real pace. Downes, the central player of the three midfield players is somehow taken out of the game.

The Southampton midfield three positions. Based on these positions, it's hard to believe the ball is on the left touchline.

Allowing an unmarked Maddison to move in behind the defensive line again to score his second of the game.
